Setting up your Microsoft 365 business (Including MS Teams for work) and Azure environment
Getting Started with Microsoft 365 and Azure for Virtual Front Desk
This guide walks you through the complete process of setting up a Microsoft 365 Business account and an Azure environment so you can use Microsoft Teams with Virtual Front Desk (VFD). Whether you are starting from scratch or need to configure an existing environment, this article covers every essential step to get your organization up and running.
Microsoft Teams integration with Virtual Front Desk enables your team to receive visitor notifications and calls directly within the Teams app, streamlining communication and improving response times. To take full advantage of this integration, each MS Teams user will need an MS Teams Phone Standard license in addition to their standard Microsoft 365 Business subscription.
This setup involves three key areas: purchasing and configuring your Microsoft 365 subscription, creating and managing an Azure account with Azure Active Directory (AAD) users, and configuring the Teams Admin Console (TAC) to allow Virtual Front Desk to dial into your MS Teams environment.
Step-by-Step Setup Guide for Microsoft 365, Azure, and Virtual Front Desk Integration
Step-by-step guide for setting up your Microsoft 365 business (Including MS Teams for work) account and Azure environment
If you wish to use Microsoft Teams with Virtual Front Desk but do not have a Microsoft 365 Business license or an Azure account, this article is for you. Please note each MS Teams user will need an MS Teams phone standard license for Virtual Front Desk to send notifications into their MS Teams app.
Purchase a Microsoft 365 Business Subscription:
Start by acquiring a Microsoft 365 business package suitable for your organization's needs. Choose a plan that includes MS Teams enterprise with a MS Teams phone standard license for each user or buy separately.
https://www.microsoft.com/en-us/microsoft-365/business
Use the same email address used for the Microsoft 365 purchase to set up an Azure account. This helps in synchronizing services across both platforms.
Create an Azure Account
Start by Creating a Free Azure Account: If you don’t already have a subscription, you can sign up for a free account on Azure.
Create a free Azure account here:
https://azure.microsoft.com/en-us/free/
Access the Azure Portal: Once your account is set up, log in to the Azure portal using your credentials.
Add Users to Azure Active Directory
Navigate to Azure Active Directory: In the Azure portal, search for and select 'Azure Active Directory'.
Add Users:
Click on 'Users', then 'All users'.
Select 'New user' to start the user creation process.
Enter the user details such as user name, full name, and password. You’ll also have the option to assign roles and define user settings during this process.
Review and Create: Once all information is provided, review the details and click 'Create' to finalize the user's account setup.
These steps allow you to effectively manage user access within your Azure environment, ensuring that the necessary individuals have the appropriate access to your resources.
For detailed steps on adding a user and sending an invitation in Azure, you can refer to Microsoft’s official documentation in their Quickstart guide to add a guest user.
Access Microsoft Admin Center:
Visit admin.microsoft.com to manage your organization’s settings and configurations.
Assign Licenses: From the admin center, assign the Microsoft 365 business licenses to your users to enable access to necessary services like MS Teams.
Log Into Microsoft Teams:
Users should now log into Microsoft Teams using their work or school accounts to start collaborating effectively.
TAC (Teams Admin Console) Settings to allow VFD to dial into your MS Teams
Please log in at External access - Microsoft Teams admin center
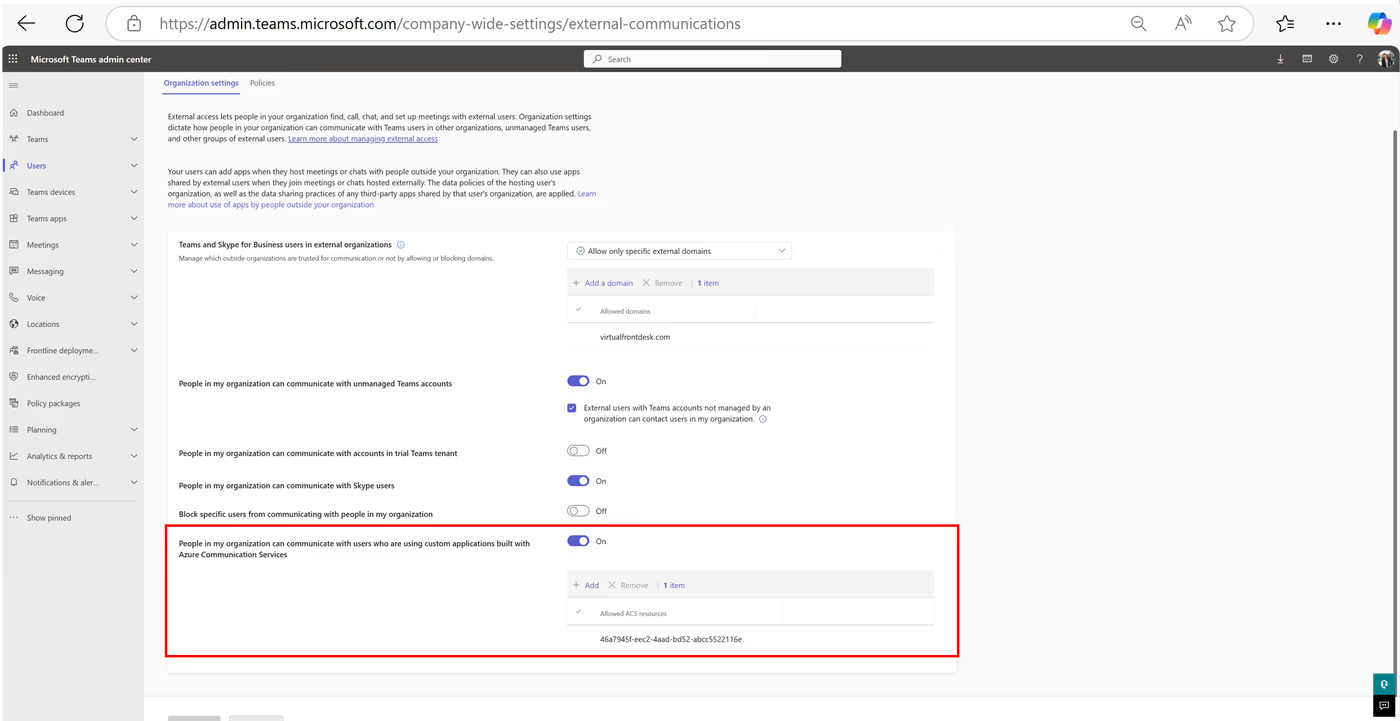
1.Enabling external access and federating with an ACS tenant are both visible in this screenshot (ACS tenants are all the way at the bottom)
Virtual Front Desk ACS Ressource number to add: 46a7945f-eec2-4aad-bd52-abcc5522116e
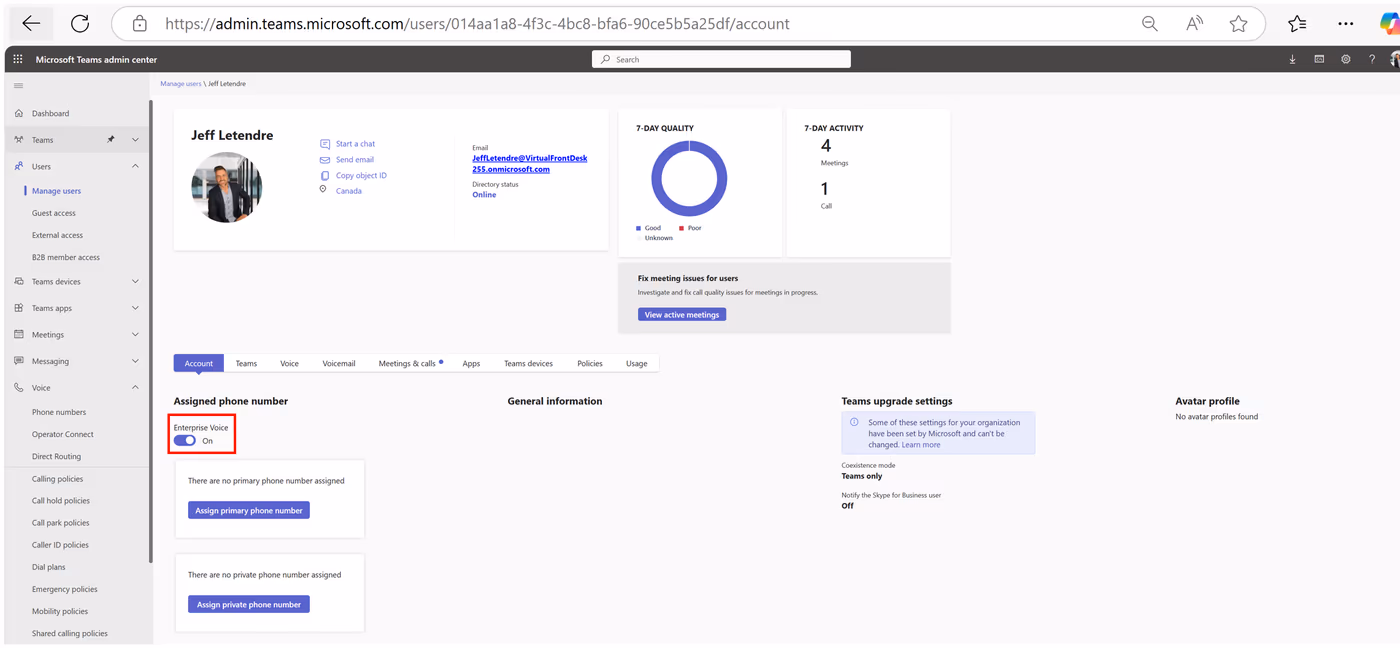
2. Enable "Enterprise Voice" for each user
As an administrator, sign in to your Virtual Front Desk (VFD) using the Microsoft Single Sign-On (SSO) to set up the MS Teams integration.
Invite Users in Azure Active Directory:
Use the search box under the User tab to invite users created in your Azure Active Directory. Once imported from AAD, these users do not need to log into Virtual Front Desk. They will automatically receive calls in Microsoft Teams, bypassing the VFD app entirely.
Key Takeaways for Microsoft 365 and Virtual Front Desk Setup
To successfully integrate Microsoft Teams with Virtual Front Desk, you need a Microsoft 365 Business subscription that includes MS Teams with a Phone Standard license for each user, an Azure account linked to the same email address, and users added through Azure Active Directory. Once users are imported from AAD into Virtual Front Desk, they will automatically receive calls in Microsoft Teams without needing to log into the VFD app directly.
In the Teams Admin Console, make sure to enable external access, federate with the Virtual Front Desk ACS tenant (Resource ID: 46a7945f-eec2-4aad-bd52-abcc5522116e), and enable Enterprise Voice for each user. Completing these steps ensures a seamless, fully functional integration between Virtual Front Desk and your Microsoft Teams environment.